DIY Jumbo Telescoping Light Writer Made from EMT Conduit
- EST - Austin
- Sep 26, 2021
- 5 min read
Updated: Jan 24, 2022
Light painting photography (light writing) is performed by taking a long-exposure photograph, holding the camera still and moving a light source while the camera aperture is open. When the picture is finished processing, the trails of light will appear to be frozen in the photograph! This can be used to create all kinds of unique photo effects, write text, and draw 2D or 3D objects!
Electrical metallic tubing (EMT) conduit can be outfitted with some simple electronics and a red-green-blue (RGB) light-emitting diode (LED) to create colorful paintings of light, where the EMT conduit is used as a low-cost telescoping pole. Two telescoping couplings from Elation Sports Technologies are used to connect three 5-foot long pieces of EMT conduit of sizes 1/2", 3/4", and 1". This creates a jumbo-sized multicolor light writing tool with an extended length of nearly 15 feet!


Supplies
Disclosure: Some of the links below are affiliate links. This means that, at zero cost to you, I will earn an affiliate commission if you click through the link and finalize a purchase.
1 x 5-ft length of 1/2" EMT conduit
1 x 5-ft length of 3/4" EMT conduit
1 x 5-ft length of 1" EMT conduit
3D-printed 5mm RGB LED cap
3D-printed protoboard mount for 1" EMT conduit
Various electronic components as listed in the other step of this article
Four colors of 28 gauge (or thicker) solid core wire, cut to length as needed for your telescoping pole (e.g. 15 feet)
Heat shrink and heat gun
For this article, we made our own 4-wire cables. But, you can also purchase pre-made waterproof cables
3 x 220 Ohm resistors for the 3 x LED colors
1 x common-cathode RGB LED, 5mm (T1-3/4) package, for example, this one from Amazon
A snap-in 5mm LED holder, such as this one from Digikey
3 x slide switches, and 1 x tactile pushbutton, for controlling the Arduino Nano to activate the RGB LED
Mounting hardware including 4 x M2 x 6mm machine screws, 4x M2 nuts, 4 x #10-32 x 1/2" machine screws, and 4 x #10-32 nuts
PC, USB-mini cable and the free Arduino IDE software to program the Arduino Nano
USB battery bank or other power supply for the Arduino Nano
You will need a camera with long exposure photography capability to take the light painting pictures (we used this Sony Cyber-Shot DSC-H300 camera, which can take long exposure photographs up to 30 seconds long) - alternatively, you can use one of the long-exposure photography methods listed below.
(Optional) Female pin headers, so the Arduino Nano can be removed from the protoboard - recommended in case it gets damaged
(Optional) Zip ties to secure the wires leading to the RGB LED
(Optional) Hot glue gun


Long Exposure Photography Methods
Long exposure photographs have traditionally been taken using a DSLR camera with a manual exposure time setting, but a number of alternative methods using modern smart phones are also available. Some are free-of-charge, and others are not. We did not use any of these alternative methods for this article, so we don't recommend any particular option over another.
Android phone:
Built-in Camera app, Pro Mode. Currently, the maximum Shutter speed is up to 4 seconds long.
Manual Camera DSLR 3rd-party app
Long Exposure Camera 2 3rd-party app - the free version allows the user to take low-resolution photographs
Camera FV-5 Lite 3rd-party app
Adobe Lightroom 3rd-party app, Pro Mode
iPhone:
Slow Shutter Cam 3rd-party app, which allows up to several-minute long exposure times
Spectre Camera 3rd-party app, offering 3, 5, and 9 seconds of shutter speed
Camera+ 2 3rd-party app, which has a slow-shutter control feature
Shutter Stop 3rd-party app
If you use any other method for long-exposure photography, we'd love to hear about your project!
Step 1: 3D-Print the Mounts
Two mounting fixtures were 3D-printed using 100% infill black PLA filament. The files can be downloaded for free from our Thingiverse account. Thingiverse is a website that hosts 3D-printing files. We used the open-source 3D-printing software Cura with a Monoprice Maker Select V2 3D printer to print these models.
The protoboard mount model clamps the outside wall of 1" EMT conduit. The RGB LED holder cap fits the end of 1/2" EMT conduit. These mounts are held in place using the #10-32 screw hardware listed in the Supplies section above.


Step 2: Electronics
Solder 4 x 28 AWG solid core wires to each of the four pins of the RGB LED. We used clear, red, black, white, and yellow heat shrink to insulate and strengthen these wire connections. Install the RGB LED into its 3D-printed mount and 5mm LED holder as shown below. The 5mm LED holder will have a tight fit in the mount, so you may need to press hard to install it!


Construct your protoboard circuit following the schematic below:

The working principle of the circuit and code is the following:
One RGB LED is sufficient to create all the colors of the rainbow, from combinations of its red, green, and blue components.
When the pushbutton is pressed, the LED lights up according to which of the three switches are enabled.
The Arduino Nano can be programmed to set specific colors by sending pulsing signals (i.e. pulse width modulation, or PWM) to the red, green, and blue components inside the RGB LED.
The smooth rainbow effect achieved in the final photographs is achieved using the Arduino code which is linked in the next step of the this tutorial.
Programming the Arduino is done by connecting it to a PC with a mini-USB cable. Open the Arduino IDE software to flash your desired code to the Arduino. The code for this project can be downloaded for free from our Github repository.
With the electronics completed, we are ready for the remaining assembly.
Step 3: Hardware Assembly
First, we created our telescoping pole from EMT conduit using a pair of x EMT conduit telescoping couplings, and three 5-foot pieces of 1/2", 3/4", and 1" EMT conduit. To cut the conduit to length, prepare it, and assemble it, check out our previous Blog post here.

Use the larger of the two 3D-printed mounts to attach your soldered protoboard to the 1" EMT conduit, near the base of the telescoping pole, again with 2 x #10-32 x 3/4" long machine screws and nuts. The circuit board is attached to its mount using 4 x M2 x 6mm long machine screws and nuts.

To power the assembly, we used a portable battery bank with a mini-USB cable plugged into the Arduino Nano.
Step 4: Camera Settings
To create long-exposure photographs, you will need a camera with this feature. We used the Sony Cyber-Shot DSC-H300 camera.

To take a long-exposure photograph using this camera:
Set the camera to manual mode by turning the top wheel to the M setting.
Press the center circle button near the screen to open the options menu.
Use the four buttons around that center circle button to set the ISO (dependent on the lighting situation) and duration of the photograph (a maximum of 30 seconds.) You might need to play with these settings until your photographs come out the way you want!
With your camera prepared and your telescoping light painter assembled, you are ready to create your own light paintings!
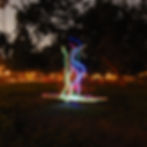
Step 5: Results!
Here are some of our creations using our telescoping light painter created using our EMT conduit telescoping couplings from Elation Sports Technologies! These paintings have a maximum height and width of nearly 15 feet!


Check out our other blog posts for more assembly tips and project ideas:
Thanks for reading, we hope you enjoyed our blog post! Come and check out our available products now for your own telescoping EMT conduit light writer at www.elationsportstechnologies.com/shop!
Austin Allen
Founder and Owner
Elation Sports Technologies LLC
