DIY Extendable Curtain Rod Using EMT Conduit
- EST - Austin

- Sep 8, 2023
- 3 min read
In this article, I share a project outline for creating a do-it-yourself (DIY) extendable curtain rod out of electrical metallic tubing (EMT) conduit! EMT conduit is an affordable metal tubing typically used for electrical wiring, which lends itself well to home projects due to its availability, low cost, and strength! This type of curtain rod is perfect for oversized or unique windows where a traditional curtain rod just won't do.

Disclosure: Some of the links in this article are affiliate links. This means that, at zero cost to you, I will earn an affiliate commission if you click through the link and finalize a purchase.
Supplies:
1 x Drapes of choice
1 x Metal file
1 x Cordless drill
Step 1: Measure and Cut
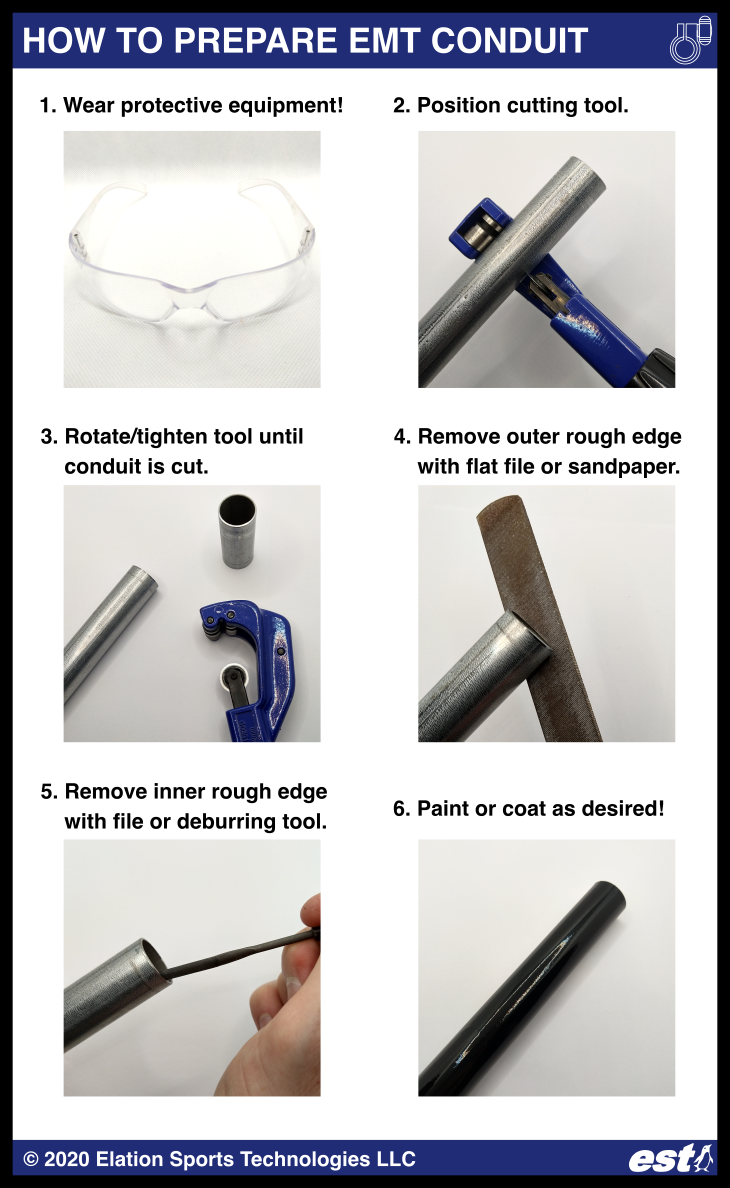
Measure the width of your window, and cut 2 x pieces of EMT conduit (the larger is 1" standard EMT size, and the smaller is 3/4" standard EMT size) in equal lengths. For example, for a 6 foot wide window, the 2 x conduit lengths could each be 4 feet. Measure 4 feet on each conduit using the tape measure, and mark it. Wearing appropriate safety gear (e.g. safety glasses), cut your conduit pieces at the marked points using a rotary tube cutter. Remove any sharp edges or burrs using a rotary deburring tool, metal file, or Dremel tool where needed.
Step 2: Apply Paint and Primer to the EMT Conduit
Add paint and primer to the EMT conduit pieces - I chose this spray paint to match these black finials (end caps). Allow the paint to fully dry before proceeding with assembly.

Step 3: Assemble the Telescoping Portion of the Curtain Rod
These injection-molded, UV-resistant EMT conduit telescoping couplings/clamps make it easy to create a telescoping pole out of EMT conduit with no drilling required! Assemble the telescoping coupling and sleeve on the 2 x conduit pieces as shown below.


Step 4: Add the Female Threaded Adapters to the Curtain Rod Ends
The finials I used for this project have an M6 size male thread, which assembly nicely with these female threaded adapters. Wrap the threaded adapter with electrical tape so it fits snugly inside the 2 x ends of the curtain rod. As shown in the photos, the finials assembly nicely with the female thread adapters, so you can remove/replace them as desired!


Step 5: Mount the Curtain Rod
Mount the universal curtain rod holders on both sides of the window at your desired height. This set of curtain rod holders comes with 3 x different mounting methods - adhesive, wood screws, or anchor screws. Choose the method that works best for your wall material!


Step 6: Add the Drapes!
With your curtain rod prepared and with detachable finials installed and checked, you can now add your drapes of choice and enjoy your homemade curtain rod! Enjoy!

Conclusion
This article shared an easy way to build your own homemade adjustable curtain rod from EMT conduit! The telescoping couplings used for this project are available for purchase from Elation Sports Technologies:
Check out our other blog posts! To subscribe to our free newsletter, click the Log In button in the top right corner of this page so you never miss a post:
Elation Sports Technologies LLC offers mechanical and electrical engineering design consulting. I'd be happy to discuss your project's needs to see how we may assist you - simply reach out to schedule a chat.
Thanks for reading!
Austin Allen
Founder and Owner
Elation Sports Technologies LLC


Comments