Adjustable DIY Mounting Poles for Backyard String Lights
- EST - Austin

- Sep 13, 2023
- 4 min read
Updated: Oct 2, 2023
The gentle glow of string lights can transform any backyard into a cozy outdoor living space or place of evening festivities! A common concern, however, is how to properly hang these lights without trees, concrete-mounted beams, or other structures to anchor them. Creating your own extendable poles using electrical metallic tubing (EMT) conduit is a cost-effective and durable solution for hanging string lights at the height of your choice, or with a lovely and aesthetic sloping effect between poles of different heights! These poles can extend and retract, and the ground stakes used to anchor the poles can be easily placed or removed to store the entire setup.

EMT (electric metallic tubing) conduit is a type of steel tubing available from most hardware stores, and is typically used for routing electrical wires in buildings, but has also grown in popularity in do-it-yourself (DIY) projects due to its low-cost, strength, and convenience for purchase. Elation Sports Technologies offers a UV-resistant adapter to easily create a telescoping pole from 1/2", 3/4", and 1" sizes of EMT conduit!
Disclosure: Some of the links in this article are affiliate links. This means that, at zero cost to you, I will earn an affiliate commission if you click through the link and finalize a purchase.
Supplies:
4 x Ground stakes
1 x Metal file
(Optional) 1 x Rubber mallet

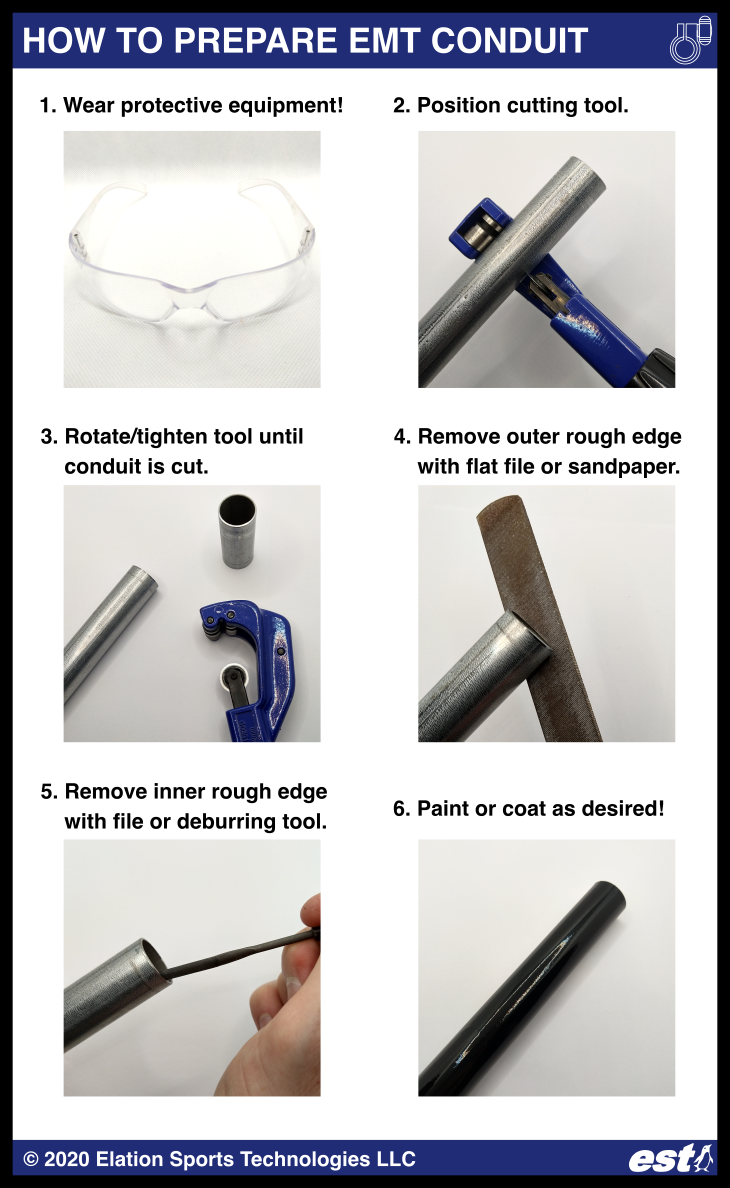
Step 1: Measure and Cut
Decide on the maximum height of your string light poles. For example, if you want each light anchoring pole to be extendable to a maximum of 12 feet tall, then each of the three sections of the pole will be four to five feet in length in order to have a bit of overlap between the sections. The bottom section will be a section of 1" size conduit, the middle section will be the 3/4" conduit, and the top will be the 1/2" conduit. Measure 5 feet on each piece of conduit using a tape measure, and mark it. Wearing appropriate safety gear (e.g. safety glasses), cut your conduit pieces at the marked points using a rotary tool cutter. Remove any sharp edges or burrs using a rotary deburring tool, metal file, or Dremel tool where needed.
This is the stage at which you could add spray paint + primer to add some color to the poles before assembling them, if desired! For example, in my EMT conduit curtain rod blog post, I used this black spray paint + primer combo to color the curtain rod.
Step 2: Assemble the Telescoping Portion
These EMT conduit telescoping clamps make it easy to create a telescoping pole out of EMT conduit! They're made of injection-molded UV-resistant and durable plastic which is suitable for outdoor use, and they clamp onto the outside of the conduit - no drilling required!

Add one 20mm black rubber pole cap to the tip of the 1/2" EMT conduit on each of your string light poles. The rubber cap has a hole in its top center which is used to hang the string lights holder hook. If your string lights poles use 3/4" EMT conduit as their top sections instead of 1/2" EMT conduit, use a 25mm black rubber cap instead of a 20mm one.


Step 3: Stake the Poles
Find an area in the ground with minimal rocks, where the ground stakes can be inserted. Position your mounting poles as desired, and insert them into the earth, pressing them with your foot, or using a mallet to install them. Insert the 1" EMT conduit (bottom section) of each telescoping pole into each of the ground stakes. The fit may be a bit light and require the use of a mallet to install - this tight fit helps to strengthen the hold.

Step 4: Add Your String Lights!
Hang the hooks of the string light holder clips in the center holes of the rubber pole caps. Attach their spring clips to the string light cord, and extend your EMT conduit poles to the desired height. That's all there is to it! Enjoy your deployable string lights for nighttime festivities!


Conclusion
In this post, I shared how you can build your own set of extendable string light poles using EMT conduit! The telescoping couplings used for this project are available for purchase from Elation Sports Technologies:
Check out our other blog posts! To subscribe to our free newsletter, click the Log In button in the top right corner of this page so you never miss a post:
Elation Sports Technologies LLC offers mechanical and electrical engineering design consulting. I'd be happy to discuss your project's needs to see how we may assist you - simply reach out to schedule a chat.
Thanks for reading!
Austin Allen
Founder and Owner
Elation Sports Technologies LLC


Comments