DIY Volleyball Net Mounting Poles from EMT Conduit
- EST - Austin

- Oct 2, 2023
- 4 min read
Updated: Oct 2, 2023
Volleyball is a tried-and-true classic sport for backyards and beaches, and is fun and inclusive for all ages and skill levels. Often, volleyball games last through the day and into the nighttime, when it becomes harder to see both the ball and the net. Additionally, different groups have different requirements when it comes to the height of the net, e.g. a group of children playing after adults may feel intimidated by the size of the net. This project guide fixes both of those issues! If you're looking to build a portable, aesthetic, and height-adjustable light-up volleyball net for your next outdoor gathering, this custom build guide for a DIY illuminated volleyball net is for you! By the end of this tutorial, you'll have a sturdy set of adjustable-height EMT conduit poles and a glowing volleyball net and ball, perfect for both day and night matches.

EMT (electric metallic tubing) conduit is a type of steel tubing available from most hardware stores, and is typically used for routing electrical wires in buildings, but has also grown in popularity in do-it-yourself (DIY) projects due to its low-cost, strength, and convenience for purchase. Elation Sports Technologies offers a UV-resistant adapter to easily create a telescoping pole from 1/2", 3/4", and 1" sizes of EMT conduit!
Disclosure: Some of the links in this article are affiliate links. This means that, at zero cost to you, I will earn an affiliate commission if you click through the link and finalize a purchase.
Supplies:
2 x Ground stakes
1 x Metal file
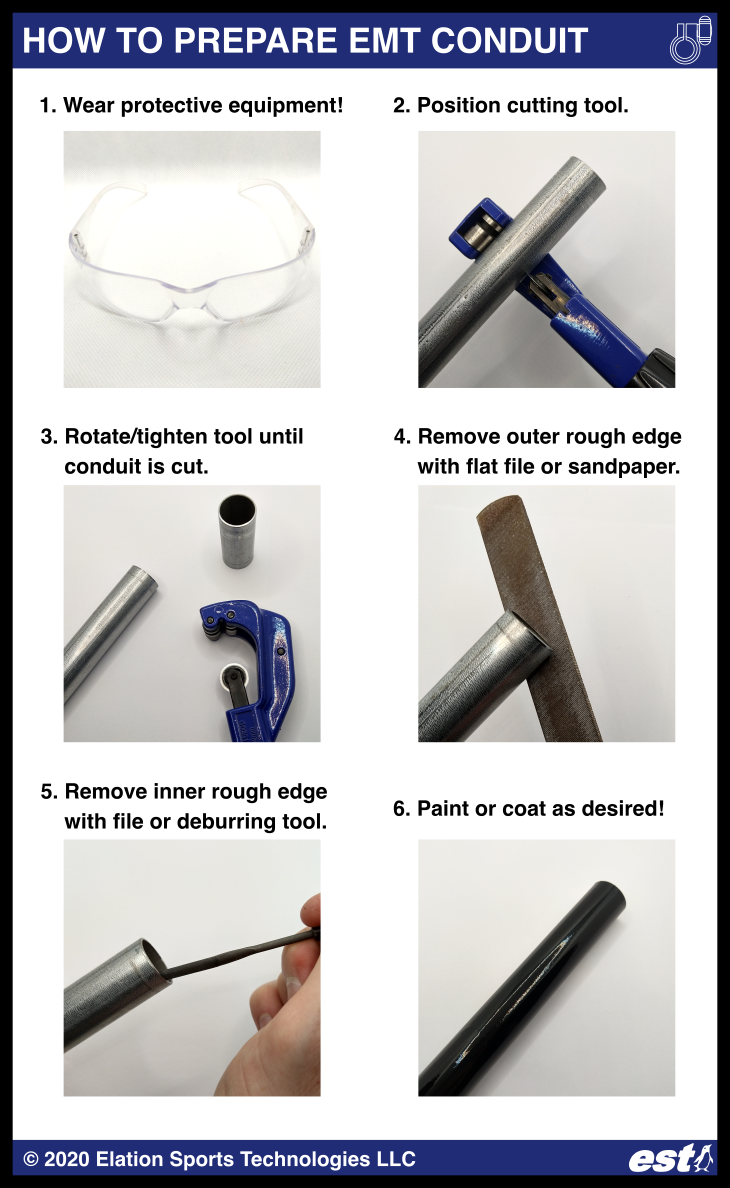
Step 1: Measure and Cut
Decide on the maximum height of your volleyball net. For example, if you want a maximum extended height of 12 feet, then each of the three sections of each pole will be four to five feet in length in order to have a bit of overlap between the sections. The bottom section will be a section of 1" size conduit, the middle section will be the 3/4" conduit, and the top will be the 1/2" conduit. Measure 5 feet on each piece of conduit using a tape measure, and mark it. Wearing appropriate safety gear (e.g. safety glasses), cut your conduit pieces at the marked points using a rotary tool cutter. Remove any sharp edges or burrs using a rotary deburring tool, metal file, or Dremel tool where needed.
This is the stage at which you could add spray paint + primer to add some color to the telescoping pole before assembling it, if desired! For example, in my EMT conduit curtain rod blog post, I used this black spray paint + primer combo to color the curtain rod.
Step 2: Assemble the Telescoping Poles and Attach the Net
These EMT conduit telescoping clamps make it easy to create a telescoping pole out of EMT conduit! They're made of injection-molded UV-resistant and durable plastic which is suitable for outdoor use, and they clamp onto the outside of the conduit - no drilling required!

The illuminated volleyball net used for this project is 32 feet long. Use a tape measure to measure that distance along the ground, and install your 2 x ground stakes by pressing them into the earth. Measure the space Add the 2 x flag clips to each of the two poles - this is where the volleyball net will attach to the poles. If the EMT conduit poles are short, the bottom anchor point for the volleyball net can instead be tied to the bottom EMT conduit telescoping coupling as needed.

Add one 20mm black rubber pole cap to the tip of the 1/2" EMT conduit on each of your two poles. If you choose to use 3/4" EMT conduit as their top section of the pole instead of 1/2" EMT conduit, use a 25mm black rubber cap instead of a 20mm one.


Step 3: Connect the Electronics for the Net and Ball
The illuminated volleyball net utilizes a portable battery pack to run, eliminating the need to run a cumbersome extension cable to an outlet. Install 3 x fresh AA batteries into the battery pack. The included wireless remote can be used to set the color mode for the net.
Unlike typical glow-in-the-dark volleyballs which quickly lose their luster, the LED volleyball used for this project utilizes a small battery-driven internal light! After ensuring that the battery charge is sufficient, the volleyball automatically turns off after 60 seconds of motionlessness to conserve battery power. Simply hit the volleyball with your hand to re-activate its illumination.
That's all there is to it! You're now ready to play volleyball anytime, day or night. The height-adjustable mounting poles are easily deployed or stored away, and the battery powered volleyball and net are perfect for pick-up-and-play games. Enjoy your cool DIY volleyball setup!


Conclusion
In this post, I shared how you can build your own DIY, adjustable, illuminated volleyball net using EMT conduit! The telescoping couplings used for this project are available for purchase from Elation Sports Technologies:
Check out our other blog posts! To subscribe to our free newsletter, click the Log In button in the top right corner of this page so you never miss a post:
Elation Sports Technologies LLC offers mechanical and electrical engineering design consulting. I'd be happy to discuss your project's needs to see how we may assist you - simply reach out to schedule a chat.
Thanks for reading!
Austin Allen
Founder and Owner
Elation Sports Technologies LLC


Comments